Thursday, 12 June 2014

The future's bright...

...the future's green.

Actually very green. My much-delayed "other" Spitfire finally made it back from the paint shop last week and it's not just green but GREEN!


In fact I reckon I'll have to add some shiny bling chrome to tone it down a bit


Excellent, feels like progress on that project at last. I'd better get on with fixing the broken van that's currently blocking my driveway.

Friday, 16 May 2014

Hands off!

I notice classiccarsforsale.co.uk is using a picture of my car as an advert.
In case anyone was wondering, this particular project is definitely not for sale! :)

Sunday, 26 January 2014

So that'll be 2014 then!

Doesn't time fly when you're having fun? I managed a whole three posts during all of 2013 which is poor even by my standards. Time to catch up then...

Progress on the race car is slow but moving steadily in the right direction. All the interior (such as it is) is now fitted, the engine is back in and I'm slowly fitting up various bits and pieces.

Well that sums up about six months work in one sentence. The reality was a little more complicated of course.

The biggest issue I've encountered was that I found rust in the floorpan of the car. Nothing fatal but it needed sorting before I could be happy completing the fitting up.


That picture is where the radius arm used to mount to the body. My modified rotoflex-style suspension moves the actual mounting inboard, you can see it on the left of the picture. The actual mounting was quite sound but the original erm, wasn't...

There were a few other minor issues under the floor too, including some not-too-brilliant welding that was entirely my own work.

As a result of these things the whole car was shipped off to Willow Triumph near Darlington to have the body lifted off the chassis for a good check up.

In the end the bit shown above and a couple of rather thin rear wheel arches were the worst of it but Tim at Willow made an excellent job of fixing all the various minor issues we found and also carried out a couple of other jobs I'd thought of in the meantime but would have had difficulty doing in my garage.

Here's the same section of the car as in the first picture as it looks now. A bit different!


Once that delay was sorted out, the seat and harness went in. I don't remember whether I posted a picture of the finished seat here before so here it is in all it's glory.


And, after a lot of bruised knuckles and the usual contortions required to work at floor level on a spitfire, it really looks the part.


I did have to modify the door slightly though. Anyone who remembers this car in its previous guise may remember a similar modification to get the old seat to fit as well. This looks a bit rough at the moment but I have a plan that'll tidy it up later.


Since then the engine and gearbox have been refitted. The propshaft I had was too long to fit with the new box but I took it to Dunning and Fairbank in Leeds who shortened and rebalanced it. I've yet to try refitting it but there's no reason why it shouldn't be perfect now.

The only other issue raised by refitting the gearbox was one I'd predicted a long time ago...


...the handbrake is rather too close to the gear lever. In fact they overlap with the car in second gear as in that picture. The solution I've come up with is some bracketry that moves the handbrake lever pivot back a couple of inches. I'll need to source a shorter cable at some point but hopefully this solves the problem.


I think that just about brings things up to date, albeit rather quickly.

The latest work has been to fabricate mountings and other related hardware for the radiator, oil cooler and water pump. That's turned out to be a bigger than expected job too! More on that later when I've got a definite idea what it's going to look like.

Monday, 5 August 2013

Blast!

Assuming anyone actually reads this, I left you many months ago saying it would be a few more weeks to finish the blast cabinet and find out whether it works.

Well the good news is that it does work. Rather well actually. With some decent lighting inside the cabinet so we could see what we were doing the results are excellent. The before and after pictures speak for themselves. All the pedals and associated bracketry are now cleaned, painted and fitted back on the car.

Before...
...and after
The seat and harness came back from Motordrive too and they really look the part. A little fettling of the mounting brackets and the seat was ready to fit.


At this point however things stopped going so well. Before I fitted the reinforcing plates to the floor of the car  to accommodate the seat and belt mountings I realised the underside of the floor needed cleaning and a coat of paint. I set to with a rotary wire brush but quickly discovered that whilst the floorpan wasn't terrible it was in need of some attention if the job was to be done right. There are a couple of rust holes and the old suspension mounting point at the back isn't very pretty either (It got worse when I prodded it with a screwdriver!).


I've decided that to tackle these properly, and to make sure there are no more problems later, the body needs to come off the car again so the whole underside can be cleaned and repairs made as necessary. That meant finding someone with the space and facilities that my single garage doesn't have. The car should therefore be off for some more professional attention in the next week or two.

Unfortunately this has delayed the whole project by quite a number of weeks so there's been disappointingly little progress recently.

Once the floor is sorted out though, along with a few other minor jobs that can be done at the same time, I'm hoping to see some real progress quite quickly as the seat, harness, engine, gearbox and propshaft are all lined up waiting to be fitted.

Tuesday, 5 February 2013

And so to 2013...

Not only is it 2013 now, it's February already. I've no idea what happened to January but at least a little progress has been made on the projects,,,

The issue with the clutch release arm was resolved with a bit of fabrication. I extended the arm by cutting one side off a length of steel box to form a "C" profile channel. I then modified the end of the cast aluminium arm so the channel would bolt up against the flat side of the casting.

The pushrod is now acting in a straight line again and bears onto both the new extension and part of the original casting so hopefully spreading the load a bit.


The arm is a little thicker now with the steel attached to it so I'm hoping there's still enough clearance between the release arm and the clutch cover when the slave cylinder is at full throw.

I've offered it all up and it seems to fit together nicely. Some better weather will be needed before I feel like dragging the car out onto the driveway to fully refit the engine and gearbox.

The next job is to clean, paint and refit the pedals before the seat and harness comes back from Motordrive. To that end I've been working with my brother on a blast cleaning cabinet. The kit came from Frost but the woodwork is all our own work (hence why some of it is a little rough around the edges!).

Here's a picture of two tired blokes leaning on the result of a weekend's work.


It kinda looks like a blast cabinet. It'll take another weekend to get it finished and find out whether it works as well.

And yes, that is a slightly rotten MGB GT in the background. I think this old car lark must be contagious.

Monday, 26 November 2012

Fame at last!

Well, of a sort anyway... The story of my race car rebuild is being published in Practical Classics magazine, starting with the current issue.

Regular readers of these web pages will notice that the printed version has some catching up to do however which brings me neatly to the latest activity in and around my garage.

The other week a shiny piece of machined aluminium arrived. This was the special adapter I need to fit the clutch slave cylinder alongside my non-original gearbox (which I realise I still haven't written about here. I'll try to get around to it eventually!).

To fit this the engine and 'box had to come out again so I enlisted the help of my dad on an unseasonally dry day at the weekend. Getting the engine out was straightforward and fitting the new adapter went well too requiring only the removal of a small amount from the edge of the gearbox adapter plate and the filing off of a small lump on the bell housing casting.


Having reassembled the gearbox, adapter plates and bell housing, even the clutch release arm and pushrod didn't foul on anything which was most remarkable given the angle at which the pushrod now has to operate.

That angle is something of an issue though so the next stage will be to try and come up with a modification to the mechanism that allows the pushrod to be positioned more in line with the slave cylinder,

Here's a photograph taken from inside the bell housing and showing the angle that the pushrod is required to take up.


The angle becomes more acute as the release arm is pushed back towards its normal rest position.

The actual difference can be seen in this picture. The black line I've drawn indicates the alignment with the new slave cylinder.


I had a few ideas on how the pushrod pivot might be moved or redesigned but none of them make much sense so far. If anyone has any suggestions how this can be re-engineered, let me know.

Elsewhere I've been assured (again) that painting has started on my road car shell. That should now be back with me early next year, Hopefully...

Friday, 2 November 2012

Catching up

Just a brief update today to catch up on things.

I finished the modification to the floor of the car and then fabricated some seat mounting brackets from 3mm steel. There's almost no clearance at all around the brackets when the seat is installed but it all fits. Just.

Here's the promised photo of the finished floor repairs


Since I took that picture I've also welded in some strengthening plates for the seat mountings and painted it all red again.

The seat itself has gone back to Motordrive to be trimmed and finished.

Next job will be to refit the pedals and also to go back to working on the modified clutch arrangements to try and finish that job which was started many months ago. Unfortunately that means pulling the engine and gearbox out of the car again which probably means working outdoors. This is the wrong time of year to be trying to do that.

Away from the race car I finally got around to buying a new battery for the van last week so I got that fitted today. Once fitted it was good that the van started easily, given that I've not touched it for months. It was less pleasing when I discovered the alternator was completely seized with appropriate amounts of smoke pouring off the drive belts!

I'll pull the alternator when I get chance and see if it's fixable. Brief internet research suggests that they have a habit of rusting internally and can usually be cleaned up. It will be annoying if the bearings have dissolved as it's hardly been used since I fitted it as a replacement for the last alternator that destroyed its bearings.

Tuesday, 16 October 2012

Creature Comforts

A couple of weeks ago I went to visit Motordrive Seats to try and sort out a race seat that would actually fit in the Spitfire. The Cobra seat I had before fitted pretty well but I thought I could improve on it.

Having spent a while talking to Allan at Motordrive about what could and couldn't be done I took away a bare seat shell for trial fitting. It's a very tight fit, as is everything on a car as small as the Spitfire, but it looks like it can be made to work.

The biggest issue was that to get the seat to go where I wanted it I've had to modify the floor of the car again. I'm quite tall and the floor is already lowered under the seat to allow me to get my head in under the roll cage for racing. To get the new seat in I needed to cut away the back of the lowered section and fabricate a new piece that extends the low part of the floor by a couple of inches.

All that sounds fairly simple. Just break out the grinder... The problem is that I hadn't been expecting to be doing serious metal surgery and the car is all fitted up with the new windscreen, dashboard, instruments and other things, not to mention the new paint. I've had to take great care not to embed grinding sparks in any of them.

Lack of space in the garage was also threatening to be a problem but a couple of consecutive weekends of good weather meant I could roll the car out of the garage and work in the sunshine which made a change!

Alternately attacking the floor with a cutting disc in the grinder and the Dremel for the awkward corners (plus judicious use of a large hammer) resulted in a hole in the floor of approximately the correct shape and size.


Another weekend's work saw the new metalwork fabricated and welded in place. I'll take a photograph next time I have chance to get the car outside (it's too dark in the garage). I'm quite pleased with the result although less so with the quality of my welding!

"Dry" fitting the seat seems to prove that it was worth all the effort so the next task will be to fabricate mounting brackets. As usual, none of the off-the-shelf ones will fit.

Just to add to the list of things to do, rolling the car back and forth has resulted in a nasty grinding noise at the back. I suspect one of my second hand Lobro joints in the rear axle is rather less healthy than I'd previously thought.

Sunday, 16 September 2012

A box of precision German engineering has arrived...

...and that's just the packaging!


These parts are the bits I need to complete the race car dashboard (well apart from the free pack of sweets at the top!). Most of them make up an instrument pod to house the gauges displaced from the centre of the dash by all my new switchgear.

A little work with glue and paint and it now looks something like this

Sorry for the not-too-great pictures. It's a bit dark in the garage.

I've also finished finished fitting the fire extinguisher control box at long last (that's it below the dash). I can now say that the fire extinguisher system is complete and so is the dashboard.


The next task will be to fit a seat. The one I have is really a bit too wide for the very narrow area between the sill and chassis rail on the Spitfire and I'd like to try and come up with something that will fit where I want it to go rather than fitting it in some way that it has to go because it's the only way it will fit. There aren't many race seats that will even come close to fitting in a Spitfire at all though. I've identified a couple of possibilities but need to do more research (and measurement) before spending a lot of money.

Monday, 3 September 2012

No, not that car, the other one

It's way past time I made an update here. Last time I wrote anything almost all progress on the race car had been stopped so I could pack up all the parts, store them and move all the parts of the road car out of storage to await the imminent arrival of the rolling shell.

Since then the rolling shell has completely failed to be finished, I still have a house full of parts and not much has happened except a lot of text messages and emails to try and establish what's actually happening with the shell (the answer to which seems to be "not very much" at the moment).

Not much to report then? Well I did manage to collect a lot of the remaining bits and pieces that had been left behind after the car was stripped and start refurbishing those.

For a start, here's the heater. The core seems to be intact or at least water passes through it from a hosepipe without leaking everywhere. I took that as a good sign. Flushing the matrix didn't produce masses of brown crud either so I removed thirty years accumulation of dead flies then cleaned it all up, tested the fan motor and painted the housing. Reassembly, as they say, is the reverse of the dismantling process

Smiths Heater - Exploded View
Next on the list was the fuel tank which proved to be remarkably free from internal rust and even had a tiny amount of petrol still in it after standing around for several years without the filler cap. I'm hoping that indicates a lack of leaks.

After getting rid of the remaining fuel there were a few flakes of (presumably) rust left behind so I flushed the tank with plenty of water from a hose and then dried it out. An old hairdryer I keep in the garage for these occasions fitted perfectly in the filler neck and, with the fuel level sender removed, provided a good flow of warm air through the tank to remove the moisture.

After that it was just a matter of cleaning up the outside of the tank and giving it a good coat of paint. The "before and after" pictures show a vast improvement.


I attended the TSSC International weekend at Stafford a couple of weeks ago. Apart from being a good weekend away I picked up a well worn looking fuel gauge for £2 and having got it home and cleaned it up it looks like a new part now so that's my entry for "bargain of the month" I think.

Progress on the race car hasn't been entirely zero. Whilst all this was going on I've obtained a CAD package and spent some time learning how to use it to produce a drawing of the adapter I need to be able to fit the clutch slave cylinder for the new gearbox. The next step is to try to turn the drawing into the actual item.

I've also started work on designing a new rear suspension upright. That's a longer term project in its own right and has thrown up a few challenges of its own, not least of which is my lack of skill at engineering drawing. I'll write more on this one once I have a better idea whether my plan has any chance of working.

Thursday, 19 April 2012

Odds and ends

Lots of odds and ends sorted out since my last update. Helped along by a long Easter weekend.

Having got the engine mounted properly I was able to finish making the mounting plate for the back of the gearbox. This is just a flat piece of 4mm steel drilled to mount onto the original chassis holes for the Triumph gearbox and then also drilled to accept the new gearbox mounting which is the same as a Ford type 9. A relatively easy job apart from having to dodge the rain showers whilst trying to apply paint.

I've also made up some proper mountings for the fuel tank. Previously it has always been mounted securely enough but I've never been entirely happy with the arrangement. A bit of fabrication with some aluminium box and angle has sorted that out.


Yes, there are a lot of blanking grommets in the boot floor! This car has seen a number of different tank mounting and plumbing arrangements over the years, plus all the holes that Triumph put there in the first place.

At some point I decided to fit two fuel pumps to the car. I don't entirely remember the reasoning behind this decision but it probably had something to do with protecting against pump failure during a race.

In any case, I fitted all the plumbing and finished the wiring for the pumps. The result now resembles a refinery but at least I shouldn't have a problem with fuel flow to the carbs!


There's just the last length of pipe to fit from the fuel filter out through the boot floor but I ran out of fuel hose at that point.

I've also finished building up the wiring harness for the engine bay and tested it. I'm happy to report that everything works except the horn and that's the fault of the horn itself (bought second hand "tested and working"!) rather than my wiring.

I think that the only electrical circuits I've not been able to test now are the radiator fan, water pump, water temperature sender and reversing lights. The first three because I don't have them on the car yet. The reversing lights because I broke a terminal off the switch whilst fitting it. A replacement is on order.

In between the bigger jobs I fitted a few external parts to the engine. When I came to fit the distributor I realised it still had a cheap "temporary fix" rotor arm in it. I have some good quality ones on the shelf so I fitted one of those but whilst doing that I noticed that the shaft didn't rotate smoothly.

That seemed odd, especially as the problem seemed to come and go at random as I spun the shaft. It seemed further investigation was in order. Stripping the distributor revealed that it was full of aluminium dust. It also revealed the reason why.


That screw, washer and spring washer were under the bottom plate that carries the advance weights and were gradually being thrown around and grinding away at the body. Part of the bottom plate was also bent.

I've no idea how long they've been in there. Obviously the engine has been running like that judging by the amount of swarf.

Once everything was cleaned and reassembled there was a screw missing from the baseplate at the top so presumably that's where the errant one came from.

Whilst reassembling I realised I'd failed to take note of which way round the drive dog was supposed to fit so I've no idea whether I've refitted it correctly or 180 degrees out. I'll have to check before fitting the unit to the engine.

The distributor cap also broke when I put that back so I'll have to try and track down a source of good quality replacements. The spare I have on the shelf is made of really thin and nasty plastic.

Next job is to borrow an extra pair of hands to complete the wrapping of the front sections of the wiring loom. After that there are a couple of light bulbs and a replacement horn to fit but I don't think there are many more big jobs to do before I stop work on this car in order to start on the other one.

That's not to say I won't have thought of a few more by next week mind you!

Monday, 16 April 2012

Suspension Turret Comparison

Well the engine is finally in properly. It turned out that I had somehow acquired a Spitfire suspension turret on the right hand side of the car and a non-Spitfire one on the left.

Apparently all the "small chassis" Triumph cars apart from the Spitfire and the very early Herald 948 use the same suspension turrets. The Spitfire has a slightly different design which makes the front of the engine sit lower down to clear the low bonnet line. I'm told that the early Herald has a completely different design but I've not seen an example of those.

Thanks to all those I spoke to about the problem and those who posted in reply to my query on the Club Triumph web forum. Also thanks to Pete at Yorkshire Triumphs who let me loose in his yard with a tape measure to compare the parts fitted to various cars.

In the end it became obvious that (early Herald excepted) there are two different left hand turrets and two different right hand ones. To fit a Spitfire engine, you need a matched pair of Spitfire turrets. To perform the common conversion of fitting a six cylinder engine in a Spitfire chassis ideally you need a matched pair of non-Spitfire turrets. It does seem though that this conversion can be performed if you only change one side which probably means there are more cars out there with mismatched turrets.

There seems to be very little information published on what the differences in these parts actually are. (Either that or I've been looking in the wrong place!). Having got both parts together I took some photographs and measurements in the hope that they will be useful for anyone else with similar problems.

First of all, here's the two turrets side by side and viewed from the inside, that is the side that normally faces the engine. The Spitfire part is on the right of this picture.


The only difference appears to be the engine mounting on the front of the turret. You can see in the picture that the Spitfire engine mounting is visibly lower.

Of course that wouldn't be obvious if you don't happen to have both parts to hand to compare them. Fortunately there seems to be an easy way to tell which kind of turret you are looking at.

On the Spitfire turret, the engine mounting face is flat with a small raised flange at the end. The non-Spitfire one has a crease running vertically down the centre.

Non-Spitfire turret
Spitfire turret
There are also differences in the dimensions. These pictures didn't turn out quite as well as I'd hoped but the Spitfire engine mounting is lower and also further inboard.

Non-Spitfire. Shorter top flange
Spitfire. Longer top flange
Non-Spitfire. Taller from chassis to engine mount
Spitfire. Much lower from chassis to engine mount
The measurements will vary between the left and right hand turrets as the engine mounting faces are different from one side to the other however both sides have the flat face mounting for the Spitfire and the mounting with the crease otherwise.

Hopefully this will help prevent someone else falling over the same issue I had. Once the correct part was fitted the engine bolted in easily.

Sunday, 25 March 2012

How do you know if an elephant's been in your fridge?

A weekend spent mostly lying upside down where the driver's seat should be with my head under the dashboard has resulted in all the wiring and plumbing under there being completed. It has also resulted in the somewhat unusual phenomenon of footprints on the roll cage!

Both fire extinguisher and battery are now fully fitted and I've tested all of the wiring that I can at this stage. The good news is that it all works! There were a few minor things wrong but they were soon sorted out. Specifically;

The headlight flash didn't work due to two terminals on the switch being the wrong way round. Easily resolved though took some head scratching to figure it out. Now I know why I spent so long drawing up that circuit diagram.

The indicator relay was suffering the same problem (reversed connections).

The oil pressure warning light had a loose bulb.

I didn't think that was at all bad for the first test of a completely custom built wiring loom. There are a few things I can't test as I haven't fitted them yet but still a nice result so far.

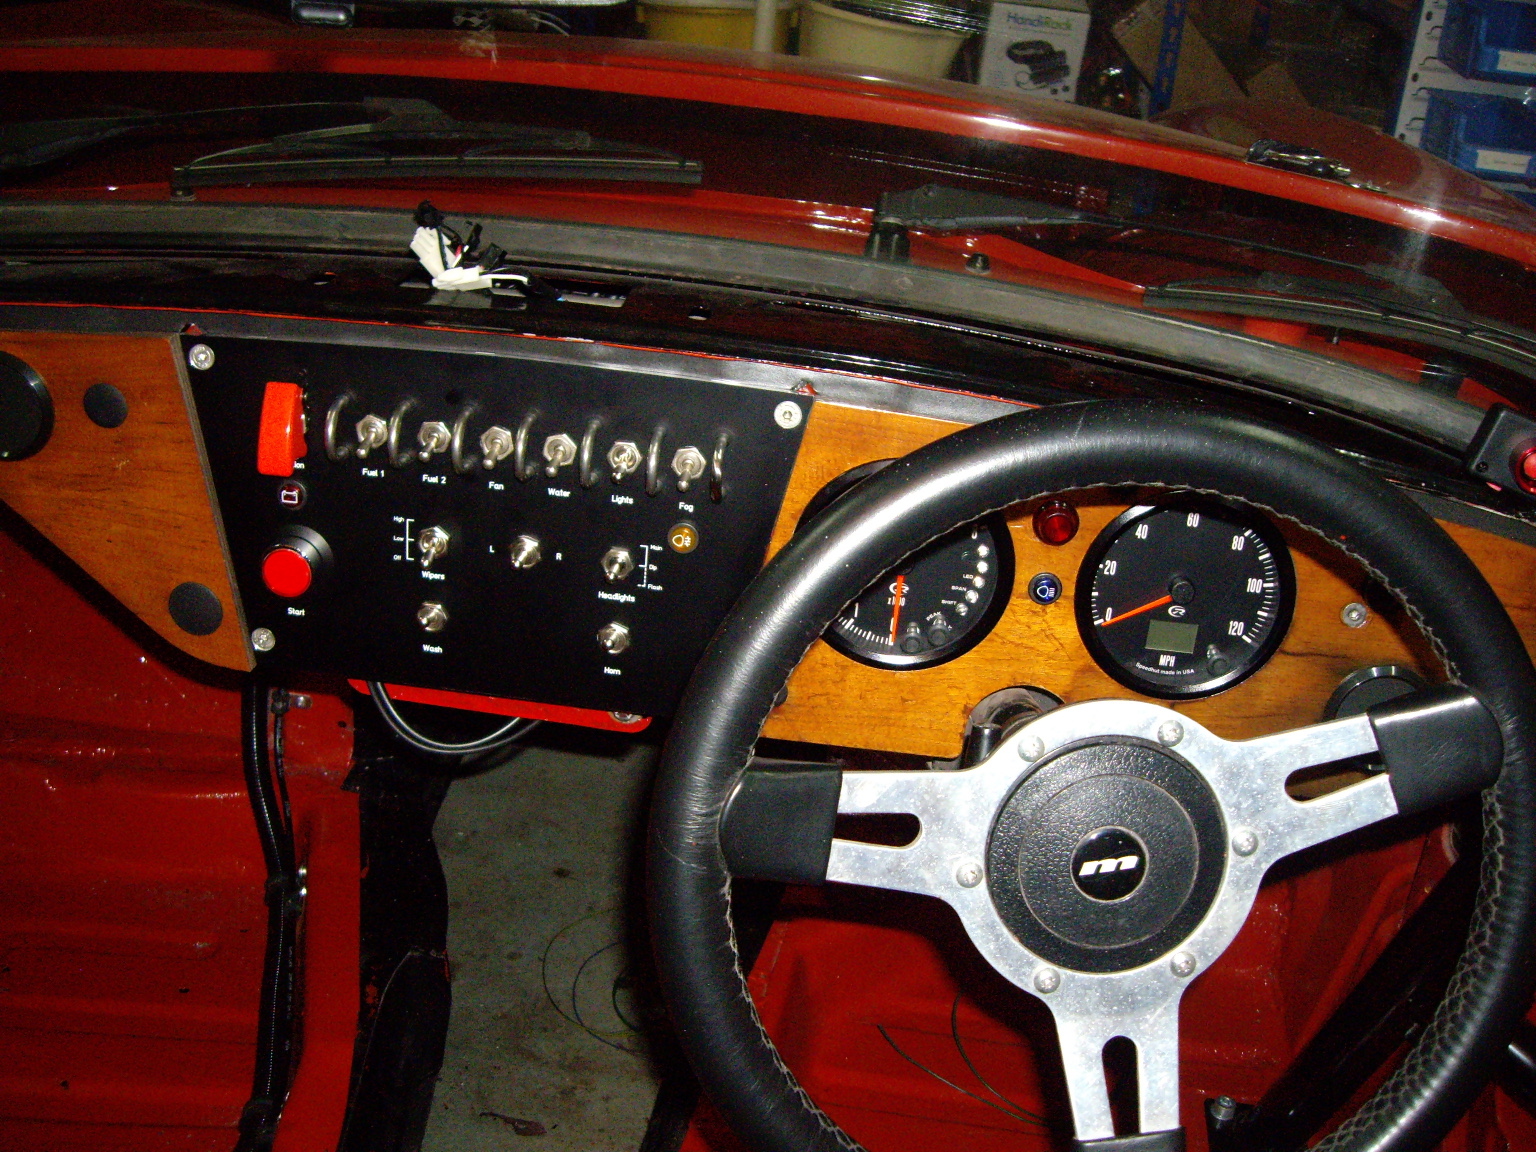
Here are a couple of pictures of the new dash in situ.


The fuel pumps and filter have been refitted in the boot ready for the tank to be plumbed in. I decided to make a better mounting for the tank than the odd bits of bracketry I had before so that's on hold until I can get hold of some aluminium box and angle to do some fabrication work.

This weekend I started by fitting the front lighting to the bonnet and quarter valences. The sidelight/indicator units fitted easily and so did the left hand headlamp but when I fitted the right hand headlamp it was obviously sitting at an angle and the cowl wouldn't fit over it either. After a lot of measuring I re-drilled the mountings so it would sit straight and also moved it over about 2mm. Such are the joys of working with a glass fibre bonnet.

After that the cowl still didn't fit and there followed a lot of fitting, dismantling, measuring, refitting, fabrication of spacers, dismantling again and so on. After a disproportionate amount of effort though it all eventually went together properly and everything lines up so it actually looks quite good.

I only stripped one thread in each of the cast alloy cowls too. They really are a poor design.

So that actually completed all the main work I had planned to do before the end of this month. Today however, with assistance from my dad we assembled the engine and gearbox and lifted it into the car.

I didn't really know whether it would fit as the new gearbox has never actually been in the car yet so I didn't know what problems we might encounter.

In the end the gearbox went in easily. There was a problem however and it certainly wasn't one I had anticipated...


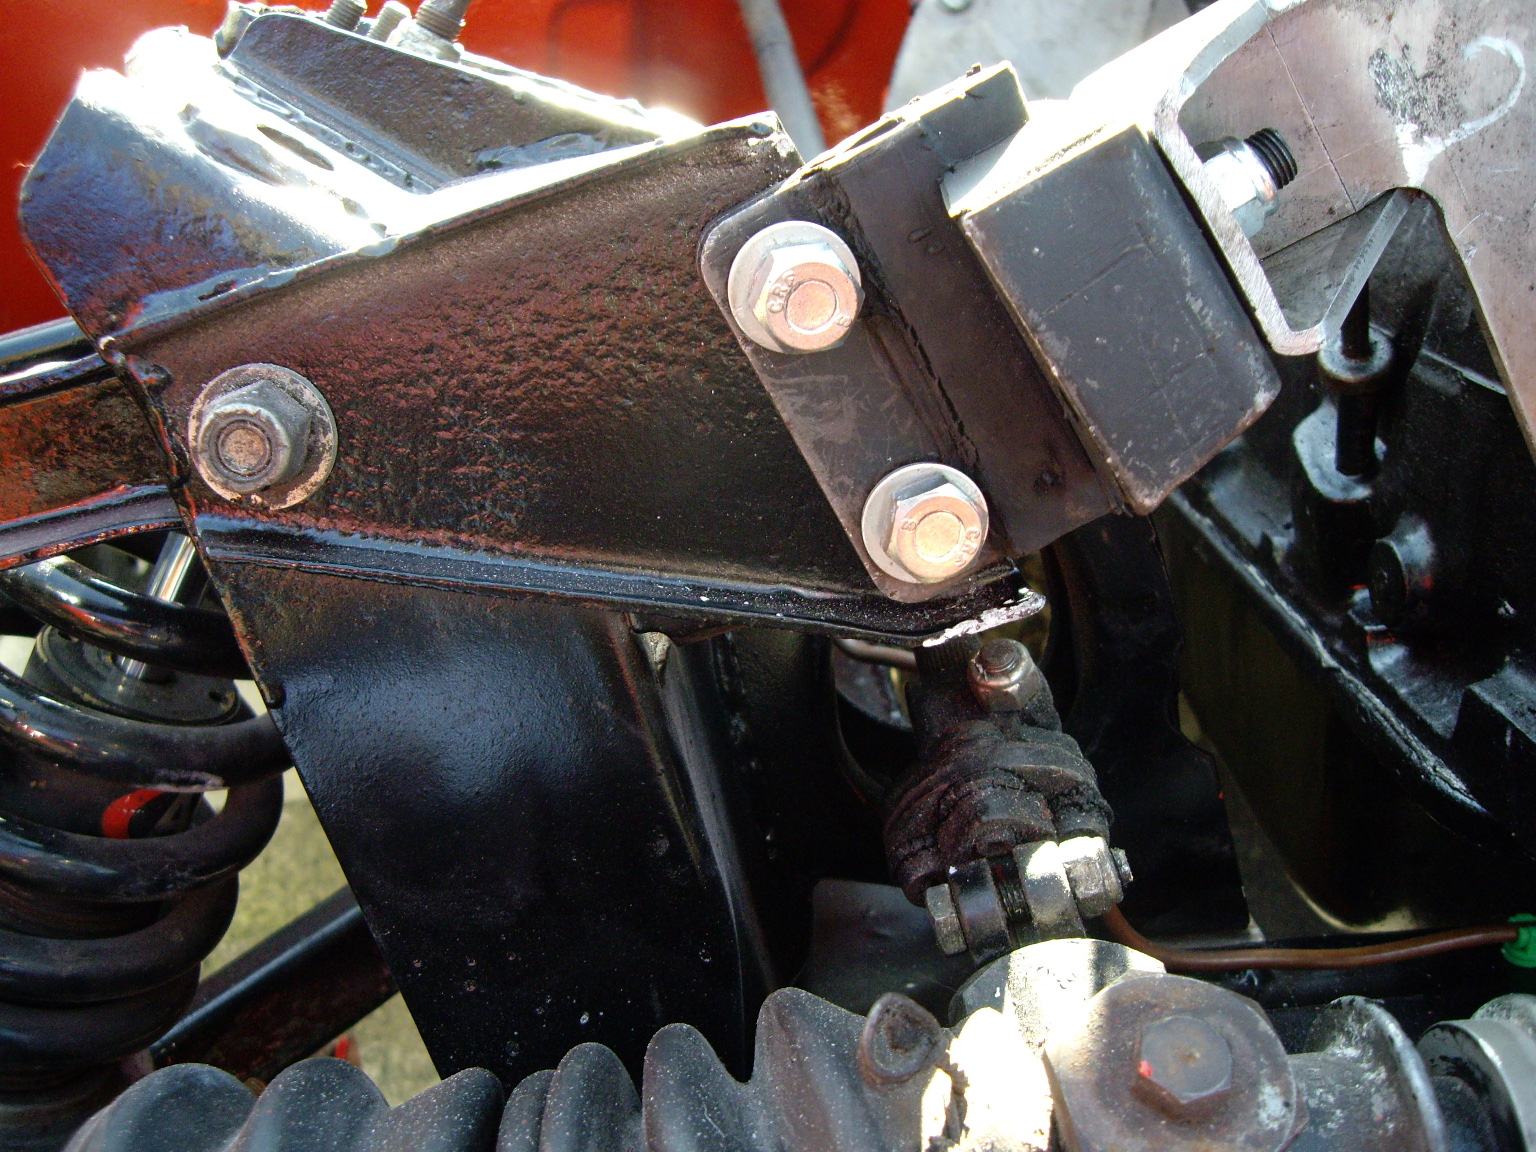
Either my engine has shrunk whilst it's been sitting around the garage or there's something wrong with the mounting points onto the suspension turrets! One engine mount fits easily but the other is an inch short...

Here are some close-up photos of the problem.


After I took these pictures I noticed that the engine was also not sitting straight in the car. Unbolting the right hand mounting and bolting in the left hand one allowed the engine to sit vertical and nicely central in the engine bay and also central to the hole in the bulkhead but of course the one inch gap is now on the other side.

That leads me to believe that the problem might be somewhere around the right hand mounting but I can't see anything that's not where it should be. I've also done some measuring and as far as I can tell the suspension turrets are where they should be with the top wishbone mounting bolts equally spaced either side of the centre line.

We tried two different sets of engine mounts. One brand new and the other being the set that were on the engine previously. The back of the gearbox isn't fastened to anything and is free to move around so that can't be pulling anything out of line.

As far as I know there's only one type of suspension turret but I may be wrong there. Is it possible the turret from a different car has got in there during the rebuild? If you have any ideas, please feel free to leave comments below. Right now I'm out of ideas.

We both stared at this problem for quite a while and in the end we both gave up. I made a temporary bracket to hold the engine in position so that we could at least release it from the engine crane. I also started work on making a mounting bracket for the back of the new gearbox.

At least with the engine (roughly) in position I can get on with taking the measurements for the remainder of the wiring loom and I can also look at working out how things like the gearbox speed sender are going to fit. The gearbox seems quite close to the chassis at that point.

So several things sorted out but a new problem to deal with. Odd how these things come from the most unexpected directions sometimes.

Saturday, 10 March 2012

The twit factor

In an attempt to enter the 21st century this blog now has a connection to Twitter!

I'll get one of those "follow" buttons on here eventually but in the meantime if you are suitable twitter-equipped you can look for @mikd43.

Apparently it's the future...


In more practical news, the race car now has the battery box and fire extinguisher trial fitted. I'm just waiting for a few bits and pieces I have on order before I can complete fitting these and lay in the plumbing for the extinguisher.


The fuse box is also fitted. On the electrical side the next step will be to install the dashboard and start testing the wiring. In the photograph below the fuse box is still only loosely fitted in case it has to come out again whilst I'm testing.


While all this work has been going on on the race car the road going Spitfire hasn't been forgotten. I am reliably informed that the bodywork on that car is finally complete and it will be moving to the paint shop next week.

That means I need to wind up work on the race car in order to clear the garage for when the other car comes back. The plan at the moment is to complete all the ongoing electrical work but if there is still time I'd like to offer up the engine and gear box assembly to see whether any major work is going to be required to get that to fit. If so I can plan that whilst I get on with reassembling the other car.